 Salamba Shirshasana or the Headstand is widely known and praised as the “King Of Yoga Asanas”. This yoga pose is intimidating for new yoga practitioners but it is basically just a balancing posture. When every part of the body begins to get strong with yoga, one is able to find that “balance” and conquer the “Headstand”. The headstand is a pose which embraces “Tapas,” the third of Patanjali’s Niyamas, translated as ‘austerity‘ or ‘discipline‘. It encompasses overcoming fear and improving core strength.
Anatomy of The Neck During Headstand
Apart from its awesome stance (standing on our head!), the posture requires strength, precision, and focus. However, when headstand is assessed from an anatomical point of view, it is categorized as a resting pose, despite its complex look. The “neck” plays a fundamental role in the headstand, so one requires to take a closer look at the anatomy of the neck. The cervical spine is comprised of seven vertebrae, designed specifically for mobility. Also known as the C spine, this includes the neck bones and its primary purpose is movement.
A cushion of connective tissues holds the cervical vertebrae in place making a whole range of movements possible for us, be it flexing, extending, or rotating of the neck. The cervical spine is basically concave in nature. By default, the neck rests in a slightly curved position at its neutral state. To move the neck away from this state, this curve is disturbed, which can often happen during yoga asanas. The key is to maintain the basic curvature of the spine to prevent neck injuries.
The C- spine also encompasses the vertebral arteries. These reach up to the brain and hence blocking these arteries in any way may cause dizziness or blurred vision. In a posture like headstand, the movement through these arteries can be compromised because of misalignment or additional pressure on the cervical spine.
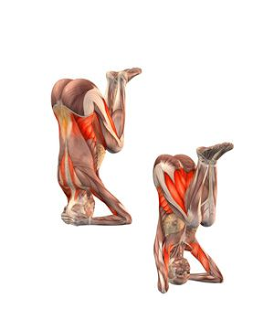
Muscles and Joints Involved
In Shirshasana, muscle lengthening does not happen and all body parts either contract or stabilize, one stacking over another in a single plane. While in the pose, our upper body forms a firm foundation with the essential contact points being the crown of the head, the forearms, and the wrists. All of these are connected together to hold the body in place.
We need strong arms to do the headstand. So, it is necessary to build a foundation of strength in the arms to be able to physically balance a headstand. We need to practise suitable arm strengthening exercises before attempting the pose.
As we go into Salamba Shirshasana, our shoulder blades get weighed down, helping to release any kind of tension from the cervical spine. There should be minimum weight on the head. The rotator cuff muscles and serratus anteriors shorten while the triceps brachii get stabilized. This aids in keeping our shoulders and arms steady. This pose stabilizes the rectus abdominus, spinal extensors, iliopsoas, and flexors.
The pelvic floor muscles get compressed while keeping the sacrum (base of the spinal column) in control. The entire upper body forms a solid base, leaving the lower body relaxed even in this inverted-upright position.
Our shoulders are the source of strength and support at the foundation. As soon as we come into the headstand position, we rotate and protract the shoulder blades in an upward direction (towards the hips). The serratus anterior is the strongest muscle for carrying out these actions involved in Salamba Shirshasana.
Alignment in The Headstand
We often find that yoga students, especially beginners, look wobbly while doing the headstand. A steady headstand is subject to the positioning of the body. Finding our balancing center-line in a headstand boils down to our bone structure supporting us. We will be using our muscles to keep our bones stacked vertically on each other.
A tried and tested formula for getting our alignment right is “Samasthithi” or Tadasana i.e, standing upright in balance. This means not just practising it, but rather perfecting that straight vertical line, wherein we are perfectly balanced on both sides of the body (left and right) and also balanced in the front and back of the body, so that we can maintain the same while we practise headstand.
As a beginner, it is alright to use wall support so that all our attention is not focussed on just balancing in the pose. Work on getting the alignment correct, then practice balance. There should not be a lot of weight on the head. The idea is to foster arm strength and a habit of lifting the shoulders towards the roof. This helps in taking the weight off the neck and placing it on the shoulders instead.
Next we need to consider the positioning of the hands. There are two variations to this. One, is the hands staying open and the other is the hands closed into a single fist. In the open-handed scenario, the head goes further forward and so do the shoulders. Conversely, when the hands close to form a single fist, the head moves back in space and the shoulders accompany it.
Our aim, as a beginner, is to maintain a forearm balance with the head touching the ground lightly. Those with proportionately shorter upper arms than their lower arms usually find it easier to form a single fist. Due to the upper arm being short, the shoulders still go forward to contract the right tissues in the shoulder complex.
On the contrary, those with longer upper arms than the forearms will find it easier doing the headstand with hands open. Others who have more or less equal proportions can opt for either of the two hand positions.
We can ask our teacher to observe our headstand from the side. The head should come directly under the body. The upper arms should not slant excessively and the gap between the elbows on the floor should not be more than shoulder width, otherwise the neck will feel undue pressure.
Another little pointer to watch out for is that our ear should be partially hidden by our upper arms. Our entire ear being visible may be due to the fact that the head is placed too far forward and is not vertically aligned with the body. This means the weight is not evenly supported by the neck and this can possibly lead to injury.
To correct our alignment in this case, we need to slowly come out of this position, take a few deep breaths, and then position the head so that it is an inch or two closer to the elbows. We have to remember that balance is not as crucial as alignment.
We must also ensure that while in the headstand, we look straight ahead instead of looking at the floor or ceiling. If the gaze is towards the ceiling, the neck is likely to be too curved. On the other hand, the neck may be too flat if one is looking at the floor. The alignment of the neck is important as these positions may place additional strain on the soft tissues around the cervical spine.
Precautions To be Taken
Precautions and contraindications to practising the headstand have to be kept in mind. Those with osteoarthritis of the C spine, cervical spondylosis, diabetes, heart problems, down’s syndrome, autoimmune disease affecting musculoskeletal system or any other condition impacting the neck should proceed with caution, consulting their health specialists or omit this pose altogether.
Conclusion
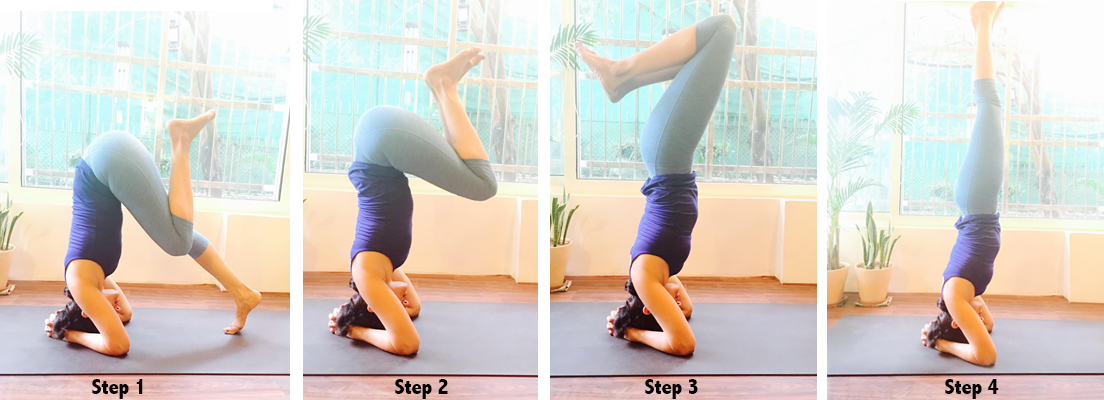
After having comprehended all the alignment aspects, we need to put them into practice while doing the headstand. Consider practising the pose with the back a foot away from the wall so that you can experiment with shifting the weight backwards without falling.
Headstand can be immensely beneficial for our circulation and the state of our mind. It helps relieve stress, anxiety or fear. On turning upside down, the blood flow to the brain increases which enhances our concentration and focus. Not just blood flow, this pose enhances the flow of oxygen and nutrients which benefits the hair and eyes and also brings a glow of health to the face.
Holding the headstand increases the strength of the upper body including the arms, shoulders, and back. Reversing the effect of gravity also improves digestion. The mesh of nodes and fluids that form our lymphatic system, get stimulated and this helps remove toxins from the blood.
For those with contraindications, the benefits of the pose can be availed by practising it in a modified form, such as using an inversion swing. Whether doing it unsupported or with props, it simply requires patience, attention, and a bit of focus so that one can take maximum advantage, of this fabulous posture, the King of asanas!